Showing posts with label LinuxMint. Show all posts

How to install Linux Mint 19 (Tara) Detail & Screenshots

0
How to install Linux Mint 19 (Tara) Detail & Screenshots
LinuxMint 19 Tara published on 29th June 2018. I have download it on 30th June and installed in my friends laptop. Today I am explaining the installation process in details. I have took screenshots of every moment during installation. Here is the images and descriptions. After reading the full post you would know “How to install LinuxMint 19 Tara” in harddisk.

First of all download LinuxMint 19 Tara ISO  (Read the news at this post “Linux Mint 19 Tara released and ready to download”). Check  consistency with  it’s md5 hash. Know the way to check md5 has from this post. Burn the ISO in a Disk or USB stick. Change the BIOS settings and run live LinuxMint from the DVD or USB stick. Please be informed that, I am using Linux Mint 19 Mate edition to create this post.

Choose ‘Start LinuxMint’ in Boot section. Wait a bit, live session will start shortly. Now you are ready to install LinuxMint in your hard disk.

1. Double click on the disk icon labeled “Install Linux Mint”. Installation will start, stay calm. It may take a minute to start installer.

Linux Mint 19 TARA Mate desktop

2. Welcome screen will appear in-front of you. Choose your preferred language from the list shown left side.
Welcome slide show of linux mint 19 installation
Welcome slide show of Linux mint 19 installation

3.  Now choose your preferred Keyboard layout. I select ‘English (US)’. You could change it in your desired language. Selecting the language click on ‘Continue’ button.
Linux Mint 19 Tara installation choose keyboard language
4. A new screen will ask you if you want to connect ‘Wireless’ network now or not. It said
Connecting this computer to a WI-fi network allows you to install third-party software, download updates, automatically detect your timezone, and install full support for your language.
Linux Mint 19 Tara installation connect wi-fi network
You could connect with your machines own hardware in this moment. I choose ‘I don’t want to connect to a wi-fi network right now’. Because I could do updates, install third-party softwares later. I just wanted to install the OS as soon as possible.

5.  Now an another screen ask you to select an option. It said
“Install third party software for graphics and wi-fi hardware, flash, MP3 and other media”. To run this media it will install media codecs from the installation image. So I check mark the option and press ‘Continue’ to go next.
preparing to install third party codecs
Preparing to install third party codecs

6. This is a important section to start installation. It named “Installation type”. Please select with cation because you could destroy your previous data if you make any mistake. Remember if you do any mistake, nothing can be undone or recover. I select ‘Something else’. Because this option give me full power to do anything.
Linux Mint 19 Tara Installation Type
 You could choose any one of the option shown here. All option have much information just below the title text. Say, if you choose first one, the new installation will work with previous operating system without making any problem. Your documents, music and other personal files will kept intact. Nothing will be deleted in installation  process.

If you choose the second option “Erase disk and install Linux Mint” then everything (if you have anything) will be deleted at the moment of install new OS.

OK? now click on ‘Continue’ to go next level.

7. Now its the place for partitioning your hard-disk. You could do anything with your hard disk here. Here is my hard-disk. Its a 250 GB SSD.
Manage harddisk partitions on the way of linuxmint19 installation
Manage hard-disk partitions
If you configure anything here an warning message will show the corresponding information. If you know what to do then do not hesitate. Just press ‘Continue’ to enter next.
Linux Mint 19 Tara installation select format home folder
Create and format HOME folder


It is a warning message if I made any wrong selection.  But I know that I am doing partition on a hard-disk. So no need to worry about anything. I just set a partition as my ‘HOME’ folder and tick on check-box to format this partition as ‘Ext4 journaling file system’. Keep in mind that it is normal.
LinuxMint19tara partition warning
LinuxMint19 Tara partition warning


It is a regular warning which aware me if I made any wrong on the previous section. If you don’t believe yourself, then please click on ‘Go Back’ button and check everything again. But if you know what are you doing, then click ‘Continue’.

After completing partitioning the hard-disk you have made the hard-disk to ready to take OS files. You could start copying installation softwares now. So click on ‘Install Now’ button.

If you need some idea to partitioning a hard-disk, please feel free to ask me in the comment section.

8. Install has not start yet. Please select your timezone. Let the system know where are you living in the political earth. Click on the country where does you live in.
Linux Mint 19 installation slide selecting timezone
Select your timezone
9. Now inform the system about your identity. Who you are and what is your system name. That means it is the place for ‘User creation’. You should write a password here. You will get three options to make you system safe. You could encrypt the home folder. You could set the system to ‘Log in automatically’ or ‘Require the password to log in’. I always select it. Press ‘Continue’ to start installation.
LinuxMint19 Tara installation slide User Creation and set password
Create user and set password
10.  Linux Mint 19 Tara installation has started. Look the progress bar that it advanced to to middle place in the background when you changing timezone or creating user information. Now time to stay relax. Look at the sky and take a deep breath. Or you could read the text on the splash screen of slide show. The first screen says
Welcome and thank you for choosing Linux Mint. This slide-show will show you around while the system is being installed on your computer.
LinuxMint19 Tara installation slide show start
Welcome in Linux Mint 19 installation

11. Browse the web
Be fast and safe on the web with Mozilla Firefox. Enjoy Java, Flash and multimedia content
LinuxMint19 Tara installation slide show browse the web
12.  Listen to music
Enjoy your music, listen to pod-casts and on-line radios.
LinuxMint19 Tara installation slide show listen to music pod-casts and radios
Listen to music, pod-casts and radios

13. Watch videos and DVDs
Insert a DVD and enjoy  movie, Watch high-definition videos with VLC.
LinuxMint19 Tara installation slide show watch video and DVD
Watch video and DVD


14. Manage your photos
Organize, enjoy and share your photos. Export your albums to share them with friends and family.
LinuxMint19 Tara installation slide show manage your photos
15. Stay connected
Keep in touch with your friends and contacts by email, messenger or on your favorite social networks. Linux Mint provides all you need to interact with twitter, Facebook, MSN, ICQ, Google Talk, AIM, Yahoo and many other networks.
LinuxMint19 Tara installation slide show stay connected in twitter facebook msn
Stay connected in twitter, facebook, msn.
16. Be productive
Use LibreOffice to create professional documents, spreadsheets and presentations that are fully compatible with microsoft Office, Share printers or access them remotely.
LinuxMint19 Tara installation slide show be productive with libreoffice
Be productive with Libreoffice

17. Install Software
Browse through 30,000 free applications from the Software Manager. Enjoy screen-shots and user reviews. Install software with one click of the mouse.
LinuxMint19 Tara installation slide show install softwares with software manager
Install softwares with software manager

18. Run Windows softwares
Install Wine and run Windows Software in Linux Mint. Or install Virtualbox, and run Windows itself within Linux Mint.
Run windows softwares using wine in linuxmint
Run windows softwares using wine in LinuxMint
19. Customize your desktop
Make yourself at home and modify any aspect of your desktop. Choose from a large variety of themes, icons and backgrounds. Linux Mint is open and easy to customize.
Linux Mint 19 Tara installation slide show customize desktop
20. Keep your system up to date
Receive fixes and security updates all in one place, for the entire system including the software you install.
Linux Mint 19 Tara installation slide show keep system uptodate
Keep system up-to-date
21. Find Help
If you’re curious about something or if you’re facing a problem, simply ask around. Linux Mint is one of the most popular desktop Linux distributions and used by millions of people. It comes with a user guide, a community website, a collection of tutorials, active forums and chat rooms and one of the most dynamic communities on the internet.
Linux Mint 19 Tara installation slide show find help

At last you have done. Installation is complete. So a message will appear and said:
Installation has finished. You can continue testing Linux Mint now, but until you restart the computer, any changes you make or documents you save will not be preserved.
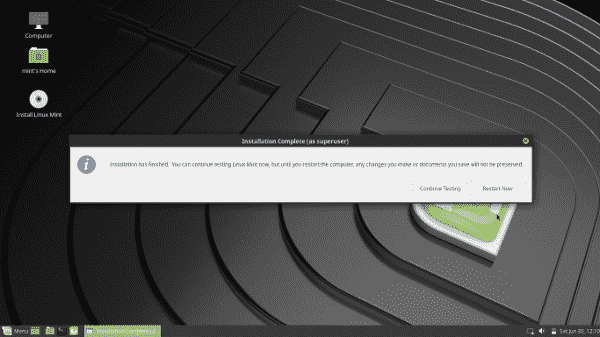
Linux Mint 19 Tara installation complete

My suggestion is if you made any documents in live mode then save them in a USB stick.

Now, it’s time to restart the computer, pull out the installation disk or USB stick and taste the fresh flavors of Linux Mint 19 Tara.

I have 2GB RAM on a AMD Duel Core processor in this test machine. In my case  installation takes 18 minute only.

Read More »

LinuxMint 19 Tara released and ready to download

0
LinuxMint 19 Tara released and ready to download
New version of LinuxMint has been released on 29th June 2018. Version number is 19 and code name is ‘Tara’.  This version is based on Ubuntu 18.04 and published in three flavor. LinuxMint took 3 major desktop environment Cinnamon, Mate and Xfce to give end user the various experience. In my case I always like Mate and Xfce. I personally use Xfce and recommend Mate for my friends. I don’t want to say anything about Cinnamon environment. That is also popular to many Linux user. I have not any saying about Cinnamon, I just wanted to limited my download. So, I choose only Mate and Xfce. This is a LTS (Long term support) release which will be supported until 2023. It contain many new features to make users desktop experience more comfortable.

Linux Mint 19 "Tara" Cinnamon Edition

Linux Mint 19 "Tara" MATE Edition

Linux Mint 19 "Tara" Xfce Edition

Here are some new features explained in Linuxmint website.

LinuxMint developers have worked hard to make this new distro more user friendly. Here are  some abstract from their official announcement.

Timeshift
It is now at the center of Linux Mint's update strategy and communication.
Using the timeshift feature user can go back in time and restore their computer to the last functional system snapshot. If anything breaks, timeshift can go back to the previous snapshot which bring a good condition to perfom the system smoothly. Actually it simplifies the maintenance of the system.

Welcome Screen
Linux Mint 19 come with a brand new welcome screen.

Software Manager
The Software Manager which was revamped and gained Flatpak support received many improvements. The search is faster, asynchronous and you can now search within categories.

HiDPI
HiDPI support gets better with every new release.

XApps improvements
Xed, the text editor, uses a new preferences window. This type of window is provided by libXapp and could be used by more applications in the future.

Other improvements
  • The USB stick formatting tool now supports exFat.
  • The Software Sources tool is able to show the installed packages from a PPA.
  • The multimedia codecs now include the Microsoft fonts.
  • All the Mint tools support HiDPI, GTK3 and Python3. Many also transitioned to AptDaemon and pkexec.

  • Pidgin was removed from the default software selection. It will continue to be available in the repositories but it is no longer installed by default.
  • Ntp and ntpdate were removed. Cinnamon uses systemd to adjust the time.
  • The PIA Manager, the set up tool for PIA VPN connections (available in the repositories), now remembers your username, password and gateway settings.
  • This release ships with linux-firmware 1.173 and the Linux kernel 4.15.0-20.
Artwork improvements
Linux Mint 19 features a superb collection of backgrounds

All informations above collected from LinuxMint Website.

Download all versions from this official download page
Download LinuxMint 19 Tara
Read More »

GL Screensavers for linux os

0
I have published a post on "Screensavers in Linux Operating System". Today I am giving you some more screen saver which are called GL Screensaver.

XScreenSaver and GL(Mesa) xscreensavers are actually a modular screen saver and locker for X11, both are containing more than 200 screen savers.

XScreenSaver package contains a small selection of 3D (OpenGL) screen saver modules from the xscreensaver collection.

GL screensavers  package contains the rest of the 3D (OpenGL) screen saver modules from the xscreensaver collection. This package is used
by both xscreensaver and gnome-screensaver. And this package could be down-loadable in almost every linux distribution's software manager.

glmatrix
glmatrix

Read More »

Screen Saver in Linux

1
We may not know that there is a huge collection of screen saver available for Linux. Most of them are colorful, attractive and aesthetically beautiful. It's name is 'xscreensaver'.

This jaigantic collection could be used in any Linux distribution. All Linux variants could download this bunch with their corresponding software or application download center.

Debian based Linux distributions like Ubuntu, Linuxmint, Peppermint, Bodhilinux, AntiX, LXLE etc. could download it via 'Synaptic Package Manager'. Other Linux users could found it in 'YaST Software Management' or their own 'Software Center' or 'Package installation Center'.


xscreen saver and its screensavers packages in synaptic package manager


What they have?

According to supplied information XScreenSaver is a modular screen saver and locker for X11 desktop. This package has capability to only blank and lock computer's screen. But this screen saver could contain more than 200 screen savers with some extra download.

Install 'xscreensaver-data' to get two non-GL screensavers 'Fiberlamp' and 'Fuzzyflakes'.

Fiberlamp xscreen saver
Fuzzyflakes screensaver
Install "xscreensaver-data-extra" to get more screen savers. This package include a set of non-GL screensavers ant, anemone, anemotaxis, apollonian, apple2, attraction, barcode, blaster, blitspin, bouboule, boxfit, braid, bsod, bubbles, bumps, ccurve, celtic, cloudlife, compass, coral, critical, crystal, cynosure, deco, decayscreen, deluxe, demon, discrete, distort, drift, epicycle, eruption, euler2d, fadeplot, fireworkx, flag, flame, flow, fluidballs, fontglide, forest, galaxy, goop, grav, greynetic, halftone, halo, helix, hopalong, hyperball, hypercube, ifs, imsmap, interaggregate, interference, intermomentary, jigsqw, juggle, julia, memscroller, metaballs, mismunch, moire, moire2, mountain, munch, nerverot, noseguy, pacman, pedal, penrose, penetrate, petry, phosphor, piecewise, polyominoes, pong, pyro, qiz, rd-bomb, rocks, rorschach, rotor, rotzoomer, ripples, shadebobs, slidescreen, sonar, sierpinski, slip, speedmine, sphere, spiral, spotlight, squiral, starfish, strange, substrate, swirl, t3d, thornbird, triangle, truchet, twang, vermiculate, vidwhacker, vines, wander, whirlwindwarp, whirlygig, worm, wormhole, xanalogtv, xflame, xjack, xmatrix, xrayswarm, xspirograph and zoom.

I am going to show some of them with this xscreensaver image/photo/screenshot gallery below.

Read More »

How much power remaining in full charged Laptop Battery

2
My two friends send me two screenshot took on their laptop some days ago. I installed LinuxMint 13 (Maya) on their laptop. Both of them are using Toshiba Satellite c100D laptop.
One of them shows that the fully charged battery has 4 hours 32 minutes of power to full discharge.
4 hours 32 minutes of battery power remaining at 100%

Another screenshot shows that 99% charged laptop battery has 3 hours 37 minutes of power.
Laptop battery has 3 hours 35 minutes remaining at 99.4 percent
I do not know the actual reason of this kind of different message in same type laptop and same type operating system.
Read More »

How long a fully charged battery run on laptop

0
264 hours 7 minutes remaining in 100% (full) charged battery
It is a common question that "How long a battery can run a laptop". It is Toshiba Satellite C800D and OS is Linuxmint13 (Mate). "Battery Charge Monitor" applet showing a ridicules information.
It shows that:
"System is running on battery power
264 hours 7 minutes (100%) remaining"

I am astonished! Really astonished!!
Read More »

Battery Charge different /variation in LinuxMint13

2
I have installed Linux Mint 13 (Mate) in my friends laptop (Toshiba Satellite). I put a Battery charge Monitor applet in a panel. System start with its native 'Power Management Applet'. Both tools running smoothly. But both shows some different date about battery power when laptop running in battery. I found different information from both tool. When I just pool out the power cable from the laptop body:
 1. 'Battery Charge Monitor 1.2.1' shows:
System is running on battery power. 4 hours 12 minutes (98%) remaining
    System is running on battery power. 4 hours 12 minutes (98%) remaining  in LinuxMint 13
    System is running on battery power. 4 hours 12 minutes (98%) remaining  in LinuxMint 13
2. Default 'Power Manager' shows:
 Laptop battery 3 hours 40 minutes remaining (97.9%)
Laptop battery 3 hours 40 minutes remaining (97.9%) on LinuxMint13

 I am really confused. I don't know which is actual reading, which shows perfect information.
Read More »

Windows button layout right to left in LinuxMint Mate

1
windows button right to left in Linux Mint Mate
Desktop settings in Linux Mint Mate
I always like changing the position of windows buttons from right side to left side. It is a Mac like style which is getting popularity day by day. You may know that Ubuntu is using this style from years. I had told you the method of changing windows buttons layout position from right to left in Xfce desktop environment and Lxde desktop environment before.


Today I am publishing the customization method in Mate desktop environment.

This is really an easy task in LinuxMint Mate.
  • First of all heed to 'Desktop Settings' through 'System > Preferences'.
  • Now click on the 'Windows' at left menu.
  • At 'Appearance' change the 'Buttons layout' from the drop down menu. There are two style. One is 'Traditional style (Right)' and other is 'Mac style (Left)'. 
  • Change will take effect instantly.
Really great! Nah!

Read More »

Booklet printing in Linux [Solved]

3
I always love to print files as booklet which has many pages. Yes, official files can not be print as a booklet, but unofficial files like ebooks, journals, articles, web pages etc. could be printed as booklet. It save paper and toner ink. So, today we will learn how to print files as booklet in Linux operating system.

Most of the printer driver support booklet printing in windows platform, but what about Linux? Yes there are some method. Though company did not provide any tweaks, you can still print booklet in Linux OS. There are several tweaks can be found on internet, but I discovered the easiest method. Printing a file in a booklet style can be done easily with acrobat reader in any linux platform.

I am using LinuxMint13 to do this job in this moment. Please follow me to enable booklet print option in your linux machine.
At first, search 'acroread' in synaptic package manager. Tick it and press apply to download. You should download this file with 'acroread-common' dependency file. 'acroread' file size is 60.1 MB. So, take some time in your hand before start the download.
acroread acrobat reader in linux mint to booklet printing
'acroread' downloading via synaptic
 After completing the download,  you could open a pdf file with Acrobat Reader instantly. Click on Print. A dialogue box will open. You could see 'Booklet' option in 'Page scaling'.
Booklet printing option in Linux Acrobat Reader
I wish now you can save pages and toner ink with this booklet printing method in Linux. There is a file called 'acroread-fonts' you could download via 'Synaptic package manager'. If you install this file in your machine, you could view Acrobat fonts without any hesitation. Remember that this dependency file is larger then 40 MB.

Read More »

Creating A New Panel in Linux Mint XFCE

2
Panel is my another favorite item in Linux desktop. I got addict using more then one panel in my system desktop. I always love to recommend it to my friends. You can add more then one Panel filled with various launcher (aka Application Link/ Shortcut). Today we will learn "How to add a new panel in xfce DE"? I am using Linux Mint 13 xfce to describe this.

Start Panel Properties from Main Menu> Settings > Panel
start panel properties main menu settings panel
Main menu > settings > Panel
You have option to start Panel properties right clicking on an empty place of bottom panel.
Read More »

Window Transparency in Linux Mint xfce

1
window transparency linux mint xfce
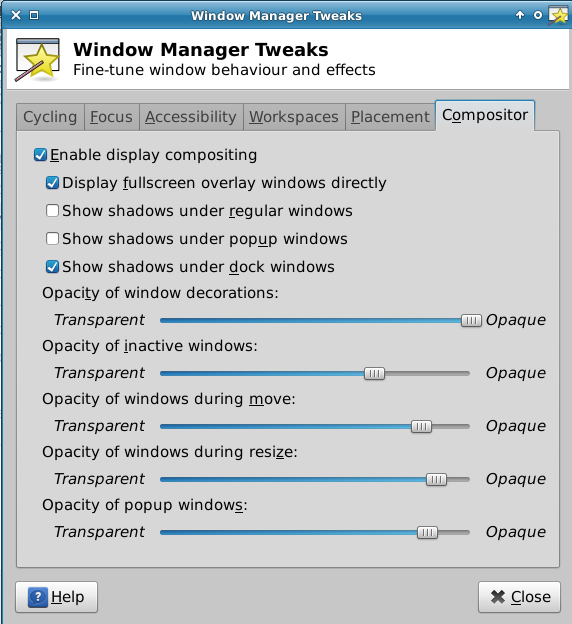
If you like to enable transparent effect in Linux Mint xfce while a window is moving or inactive then this post only for you. Enabling transparent feature in xfce is very easy. If your Computer RAM is sufficient to do so, then you could use this great eye catching feature in any xfce based linux distribution.

Use the Main Menu to heed to 'Window Manager Tweaks' through 'Settings'.
compositor for transparency in window manager tweaks tool linux mint xfce
Compositor tab in Window Manager Tweaks
After opening 'Window Manager Tweaks' directly go to the last tab named "Compositor". Now click on the radio button just beside the 'Enable display compositing'.

Now you could change value of various eye candy feature in this section.
  • Opacity of window decorations
  • Opacity of inactive windows
  • Opacity of window during move
  • Opacity of window during resize
  • Opacity of popup windows
Lets change the value moving the slider horizontally and enjoy.
Read More »

Change windows button position right to left in Linux Mint13 xfce

3
Changing position (Layout) of windows button from right side to left side is a really smarter feature like Mac OS. I like this cool style when I first found it in Ubuntu 10.04. Until then I always love to use it.

Today I am going to change windows button position from right side to left side in LinuxMint 13 xfce OS. Usually LinuxMint is a no problem operating system. Many feature make it easy to use and customize. So we could do our job with a customizing tool called 'Window Manager'.

Start 'Window Manager' from Main Menu> Settings.
window manager linux mint xfce main menu
Window manager in linux mint xfce main menu

'Window Manager' will open.
window manager linux mint xfce main menu
Linux mint xfce window manager
The first tab name is 'Style'. You could change 'Title Font', Title Alignment' and 'Button Layout' using this 'Style' tab. Explore other tabs to configure other thing in your Linux Mint window behavior and look.

How to change position? It's easy friend. Just drag the 'close', 'maximize' and 'minimize' button from right side to left side.
drag button position from right to left in window manager linux mint xfce
Drag button position from right to left in window manager linux mint xfce
You could drag and add 'Menu', 'Stick' and 'Shade' button shown on the image below.
add close, maximize, minimize 'Menu', 'Stick' and 'Shade' button in window linux mint xfce
add various button in linux mint xfce window title
Changing position of window button from right side to left side is quite tricky in Lubuntu (LXDE). If you like to explore the way please click the link below:
Read More »

Dictzip dependency problem in LinuxMint13xfce

0
A handy Dictionary is added in Linuxmint13xfce by default. I have tried to install local dictionary files with some offline deb files. I collect them from another computer where dictzip is installed via Synaptic package manager. That was an LinuxMint13 Mate machine. I collect all deb files from "/var/cache/apt/archives" folder. I use the famous installation command: sudo dpkg -i *

But, suddenly something goes wrong. Dictionary file installation has crashed. I think it is a version issue. So, I would like to do the same process from beginning. I know, now I have to fix the broken package. I open 'Synaptic package manager'. It shows a message, which says:
You have 2 broken packages on your system! Use the "Broken" filter to locate them.
Two broken package linuxmint13 xfce

The broken packages are shown below.
Dictzip wordnet-gui dependency problem in LinuxMint13xfce
I tried to fix the problem taking the help of this post 'Software index is broken', but nothing solved. The messages shown in terminal look like the text below.
dpkg: dependency problems prevent configuration of dictzip:
 dictzip depends on libmaa2 (>= 1.2.0); however:
  Package libmaa2 is not installed.
dpkg: error processing dictzip (--configure):
 dependency problems - leaving unconfigured
No apport report written because the error message indicates its a followup error from a previous failure.
                          dpkg: dependency problems prevent configuration of wordnet-gui:
 wordnet-gui depends on wordnet (= 1:3.0-22); however:
  Version of wordnet on system is 1:3.0-26.1.
dpkg: error processing wordnet-gui (--configure):
 dependency problems - leaving unconfigured
No apport report written because the error message indicates its a followup error from a previous failure.
                          Errors were encountered while processing:
 dictzip
 wordnet-gui
W: Waited for dpkg --assert-multi-arch but it wasn't there - dpkgGo (10: No child processes)
E: Sub-process /usr/bin/dpkg returned an error code (1)
A package failed to install.  Trying to recover:
dpkg: dependency problems prevent configuration of dictzip:
 dictzip depends on libmaa2 (>= 1.2.0); however:
  Package libmaa2 is not installed.
dpkg: error processing dictzip (--configure):
 dependency problems - leaving unconfigured
dpkg: dependency problems prevent configuration of wordnet-gui:
 wordnet-gui depends on wordnet (= 1:3.0-22); however:
  Version of wordnet on system is 1:3.0-26.1.
dpkg: error processing wordnet-gui (--configure):
 dependency problems - leaving unconfigured
Errors were encountered while processing:
 dictzip
 wordnet-gui
I am really sorry to say that I can not figure out the problem.
Read More »